Image QC
Image QC serves to evaluate the appropriateness of microscope images obtained from the Stereo-seq experiment for precise automated analysis within the Stereo-seq Analysis Workflow (SAW).
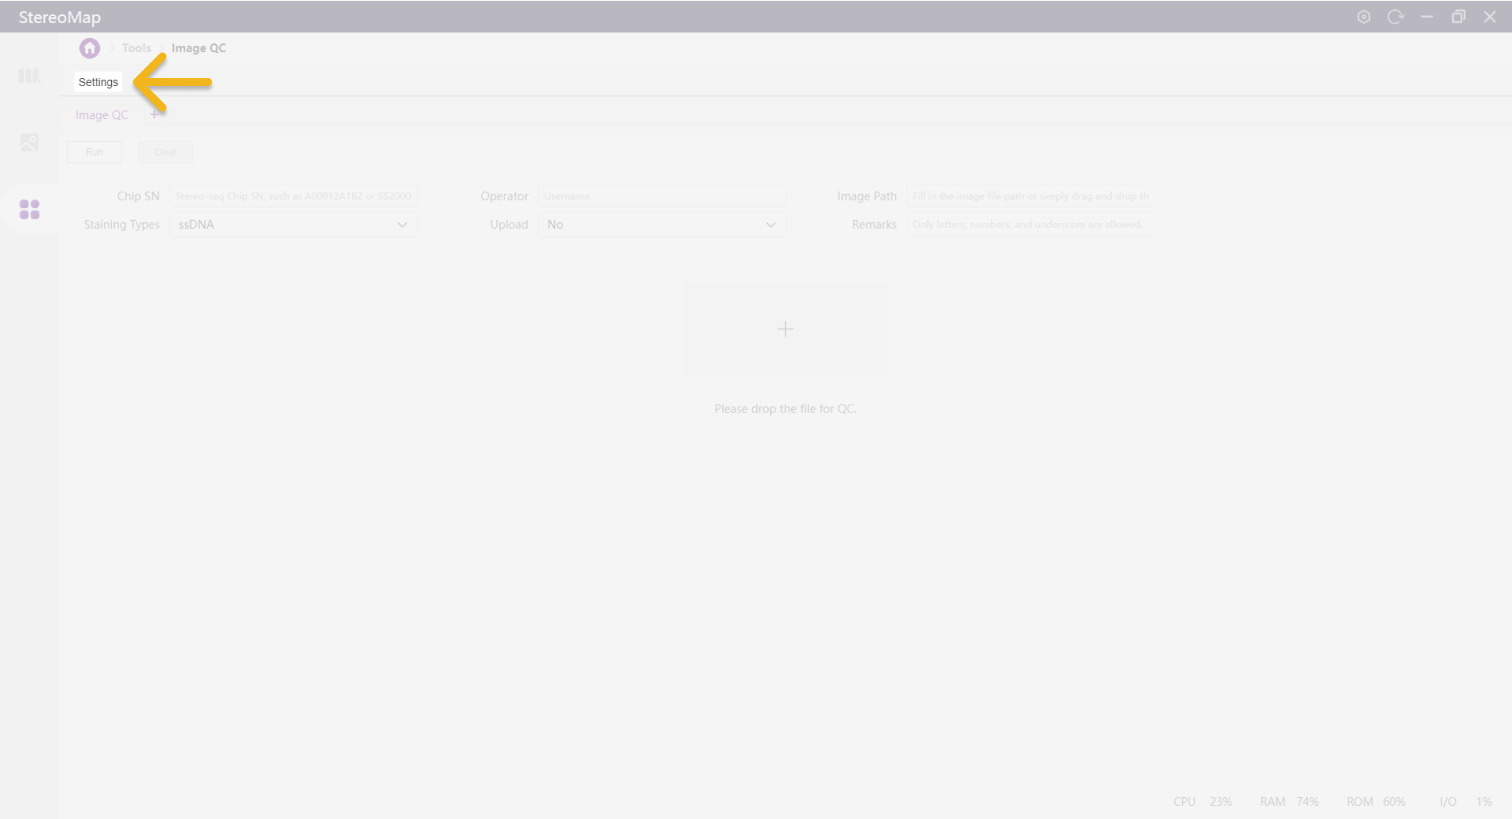
Accessing Image QC
StereoMap's Image QC can be accessed from the Tools page.

Input Image Recommendation
The acceptable types of images include nuclei-staining images (e.g., ssDNA or DAPI), a image set that has one nuclei-staining image (e.g. DAPI) and up to 6 immunofluorescence images (IF images), as well as color images (specifically H&E images). The recommended file format for images is TIFF. Additionally, some microscope file formats such as CZI files from ZEISS or image tiles organized in a folder from Motic are also acceptable. If you are unsure whether your imaging system is suitable for the Stereo-seq experiment, please refer to the Stereo-seq Imaging Requirements and Guidelines to assess your imaging system. The guideline can be accessed from STOmics > Resources Documents.
Image Data Types
This section provides details on the types of images that can be used in Image QC, their recommended file formats, and compatibility with different microscope systems.
StereoMap Image QC supports the following image types:
Nuclei-staining images (e.g., ssDNA or DAPI)
Image sets containing one nuclei-staining image (e.g. DAPI) and up to 6 immunofluorescence (IF) images
Color images, specifically H&E-stained images.
Note:
The nuclei-staining image and IF images must be grayscale images (8-bit or 16-bit). Otherwise, the images may not be correctly recognized during Image QC.
If the images have been cropped, please ensure their dimensions remain larger than 2000 px × 2000 px to prevent processing issues caused by small image sizes.
Nuclei-staining
8 or 16-bit grayscale image stores in a single single-page image file. Highly recommended format.
TIFF file (.tif or .tiff)
CZI file (.czi)
Image tiles
Nuclei-staining + IF
8 or 16-bit grayscale images store in multiple single-page image files.
TIFF file (.tif or .tiff)
Nuclei-staining + IF
8 or 16-bit grayscale images store in a multi-page image file. Only valid for the Zeiss microscope image.
CZI file (.czi)
H&E
24 or 48-bit colored image stored in a single image file.
TIFF file (.tif or .tiff)
CZI file (.czi)
Image tiles
Visit Using Image QC for each image type to get more examples.
Image File Format
StereoMap supports various file formats for image QC, including standard TIFF files and microscope-specific formats such as CZI (Zeiss) and tiled image formats (Motic). It is highly recommended to use TIFF files due to their widespread compatibility and optimal performance.
Standard TIFF files ( .tif or .tiff )
Any
.tar.gz QC output
--
The output .tar.gz compressed file from Image QC
.tif format image tiles
STOmics: Scanner Version 1.2.2
Motic: PA53Scanner 1.0.0.14
Leica: LAS X 3.7.4.23463
Other format
ZEISS (.
cziformat):ZEN Version 3.1.0.0000
ZEN Version 3.5.093.00009
Additionally, if you are uncertain whether your microscope system is compatible with Stereo-seq experiment, please refer to the Microscope Assessment Guideline available at STOmics > Resources Documents.
QC Criteria
The quality of an image reflects both microscope stability and imaging performance. In Image QC, the assessment includes detecting qualified tracklines and evaluating stitching stability. Depending on the scenario, calibration confidence may also be evaluated. The specific criteria and score thresholds vary slightly based on the image type.
The assessments include:
Trackline Detection
Tracklines are fiducial markers etched on the Stereo-seq chip surface. They are visible in microscope images and the spatial feature expression density heatmap, serving as key references to align both data modalities. A detection score is assigned based on the visibility of tracklines and the number of neighboring tracklines that help define a periodic trackline grid (or template). The inferred trackline grid is essential for accurately adjusting the scale, rotation, and position of the image during registration.
Image Calibration (conditional)
For experiments involving multiple images of the same chip, consistent stitching, registration, and tissue region alignment are crucial. However, due to staining and imaging limitations, tracklines are only visible in nuclei-staining images (e.g., ssDNA, DAPI). To ensure accurate alignment, other images—such as immunofluorescence (mIF) images—must first be aligned with the nuclei-staining image before registration with the spatial feature expression density map. In nuclei-staining + mIF scenarios, Image QC computes similarity and feature offsets to assess alignment confidence. This calibration is applied only for single-channel images.
Trackline Detection
≥ 60, sufficient number of qualified tracklines are detected. The image can be automatically registered with the sequencing-based spatial feature expression matrix.
< 60, insufficient number of unqualified tracklines. The detected tracklines cannot form a valid trackline template or do not align with the expected template. Consider retaking the image to improve trackline visibility.
Necessary criterion to pass QC.

Image Calibration
Pass, the maximum feature offset between nuclei-staining image and another image ≤ 20 pixels and the feature morphology similarity ≥ 1%.
Fail, the maximum feature offset between nuclei-staining image and another image > 20 pixels or the feature morphology similarity < 1%.
Conditional assessment indicator, only applicable in DAPI+mIF scenarios. Image Calibration pass/fail does not affect the overall QC result.

For further details on image quality assessment, refer to STOmics Microscope Assessment Guideline - Chapter 4 Microscope Image Assessment - 4.3. Image Examples.
Using Image QC
Image QC interface components are shown here:

Starting Image QC
Open the image QC tool and drag the image to the window. Please refer to QC Tips Specific for Image Types section for more practical tips for proper image naming and organization to avoid processing errors.

The Image Information section will be automatically filled. Make sure at least the required fields are accurately filled:
Chip SN
Required. Stereo-seq chip serial number, found on the bottom of the Stereo-seq chip. E.g.
S1 (1x1) chip: SS200000135TL_D1, C02533C
S0.5 (0.5x0.5) chip: FP200009107_E414, B03210C211
Large chip: SS200000108BR_A3A4, D02070C3D3
Please ensure the SN matches the correct image.
Operator
Required. User information. It is recommended to enter your email address.
Image Path
Required. Path of the image to be checked. This is auto-filled when an image is dragged and dropped into the window. Avoid using non-English characters, symbols, or spaces to prevent errors.
Staining Types
Required. The type of image staining. Valid options are ssDNA, DAPI, DAPI+mIF, H&E.
Upload
Required. Option to upload the image to STOmcis Cloud or a custom path. Valid options:
No: do not upload (default).
QC Input Files (Microscope image): uploads the microscope image in its original format.
QC Output Files (TAR.GZ): uploads the image processed by image QC.
Select all: upload both input and output files.
See Uploading Settings for details.
Remark
Optional. Any comments to the image or this QC process.
Run QC
Once all required fields are set, the Run button will be enabled, allowing you to start the QC assessment.
A comprehensive QC process involves the following steps:
QC Index Evaluation - Analyzing tracklines, stitching stability, and calibration confidence.
Image Compression - Preparing the QC result image file for further processing.
(Optional) Uploading QC files - If enabled, the image will be uploaded as part of the QC progression.
During the process, the progression status, results, and overall QC conclusion will be displayed on-screen. Further analysis suggestions will be provided based on the QC assessment.
Multiple images
If you have multiple images, you can add separate tabs for each image. Then, fill in the necessary information for each image and start the QC task. The QC tasks will be executed sequentially in the background.

Locating QC Output File
Once the QC progression is completed, the output directory will be displayed on the screen. You can find your QC result file in your file system at StereoMapWorkspace -> QC folder, or you can click on the putput path to open the folder directly. You can also change the default saving path in Setting.

Next Steps After QC
If the image successfully passes QC.
The QC output .tar.gz can be transferred to the SAW count pipeline using the --image-tar argument. This enables automatic co-processing with the feature expression matrix.
If the image does not pass QC.
You can still co-visualize the image with the feature density map. To do this, input the image file into the StereoMap Image Processing module. You may need to manually adjust or rectify issue steps before transferring the image to SAW.
QC Tips Specific for Image Types
Different image types require tailored quality control (QC) considerations to ensure accurate analysis. Below are specific tips for handling ssDNA/DAPI, DAPI+mIF, and H&E images in Image QC.
Nuclei-staining Image: ssDNA or DAPI
The nuclei-staining image undergoes quality assessment primarily based on:
Trackline Detection (Necessary QC indicator)
Below is a demo of the expected processing time and input format.
Typical QC time: ~1 min (for a 10X objective, 8-bit
.tiffile, ~20,000 px x 20,000 px on a 1 cm x 1 cm Stereo-seq Chip)Factors affecting QC time:
Larger image size
Higher bit depth (16-bit instead of 8-bit)
.tar.gzQC output (due to additional parsing time)
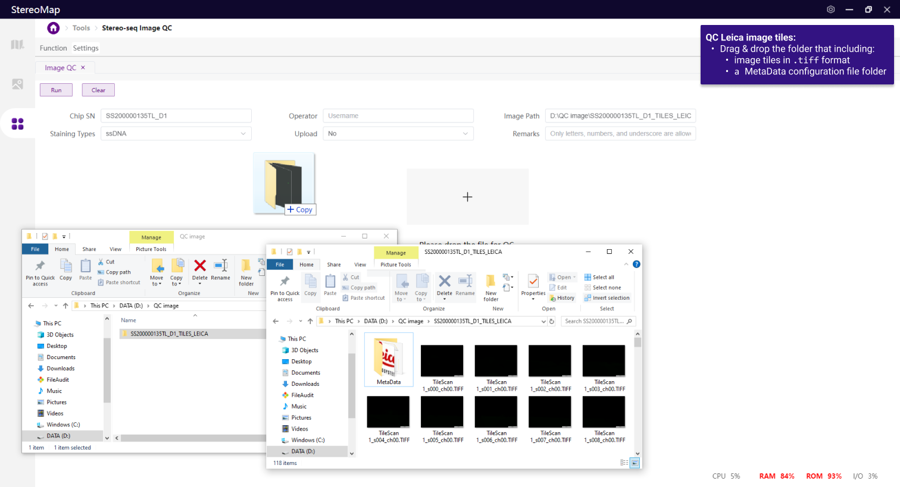
Input example:
.tif or .tiff file

.tar.gz QC output

.tif format image tiles
Motic:

STOmics Microscope Go Optical:

Leica:
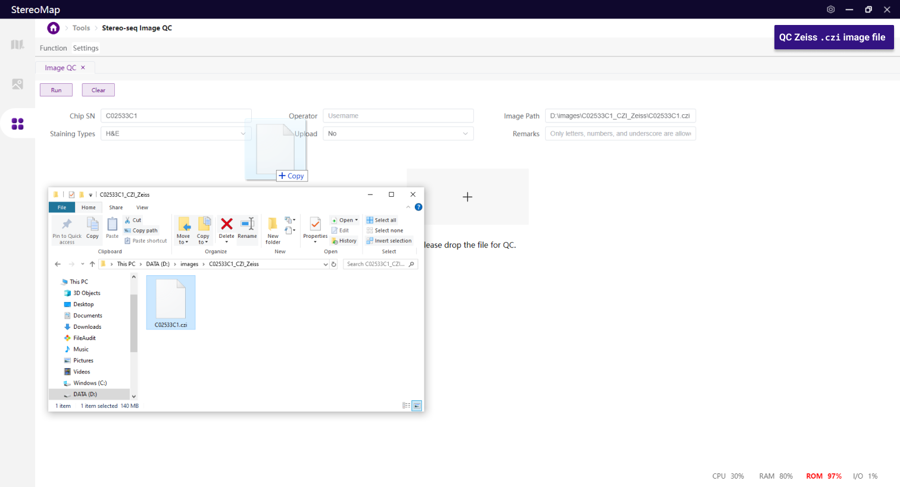
Other format
Zeiss
.czi

Nuclei-staining & Immunofluorescence Image: DAPI + mIF
The QC assessment for nuclei-staining (DAPI) and multiple IF images relies on three key indicators:
Trackline Detection (Necessary QC indicator)
Image Calibration (Assessed but does not affect overall QC conclusion)
Below is a demo of the expected processing time and input format.
Typical QC time: ~3 min (for nuclei-staining + 2 IF images, 10X objective, 8-bit
.tiffile, ~20,000 px x 20,000 px on a 1 cm x 1 cm Stereo-seq Chip)Factors affecting QC time:
Higher bit depth (16-bit instead of 8-bit)
.tar.gzQC output (due to additional parsing time)
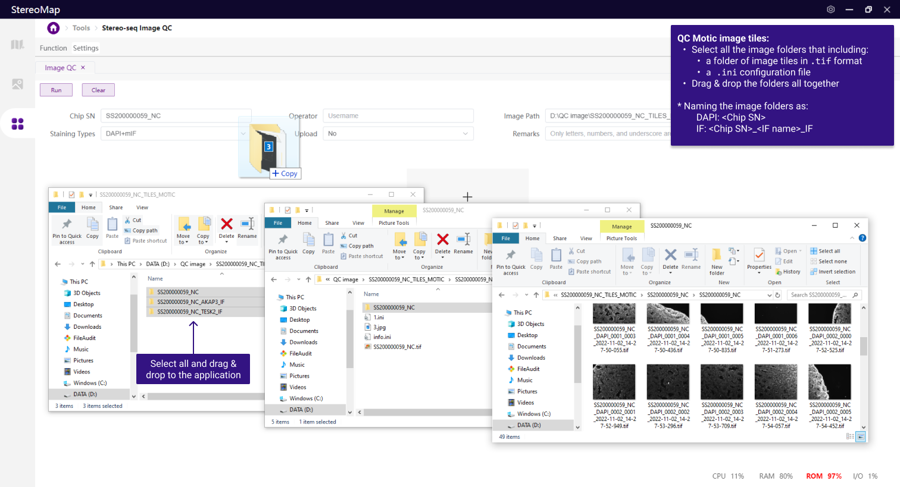
Input example:
To ensure correct software recognition, rename images or folders with the following format ("<>" embraces the information that needs to be replaced):
DAPI: < Chip SN>
IF: < Chip SN>_< IF name>_IF
.tif or .tiff file

.tar.gz QC output

.tif format image tiles
Motic:
STOmics Microscope Go Optical:

Hematoxylin & Eosin Staining Image: H&E
The QC assessment for an H&E image relies on:
Trackline Detection (Necessary QC indicator)
Detecting tracklines in an H&E image is more challenging than in grayscale images, so it is important to ensure maximum visibility of tracklines under the microscope for better results.
Below is a demo of the expected processing time and input format.
Typical QC time: ~4 min (for 10X objective, 48-bit
.tiffile, ~20,000 px x 20,000 px on a 1 cm x 1 cm Stereo-seq Chip)Factors affecting QC time:
Color image (since they are color images, making them three times larger than grayscale images)
.tar.gzQC output (due to additional parsing time)
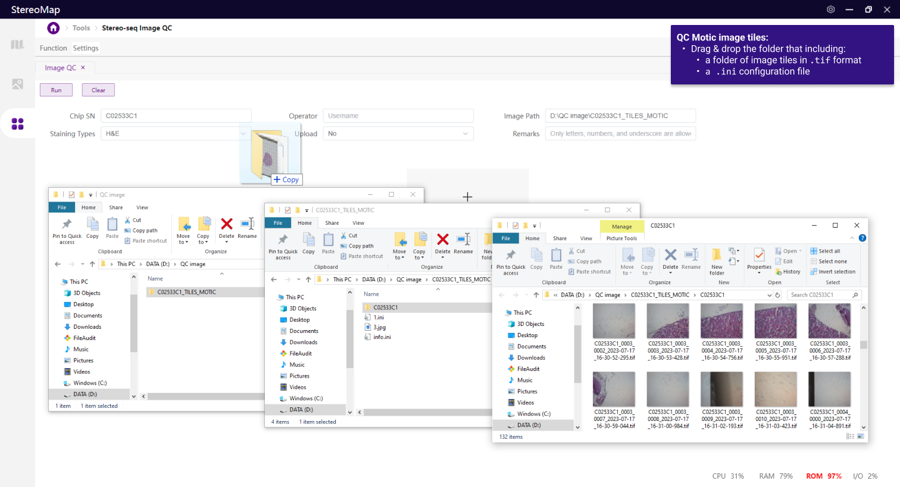
Input example:
.tif or .tiff file

.tar.gz QC output

.tif format image tiles
Motic:
STOmics Microscope Go Optical:

Other format
Uploading Settings
Uploading settings configure the transfer of image files to HPC (High-Performance Computing) clusters or cloud storage for further processing. If you are unsure which mode to use, please don’t hesitate to consult your FAS.
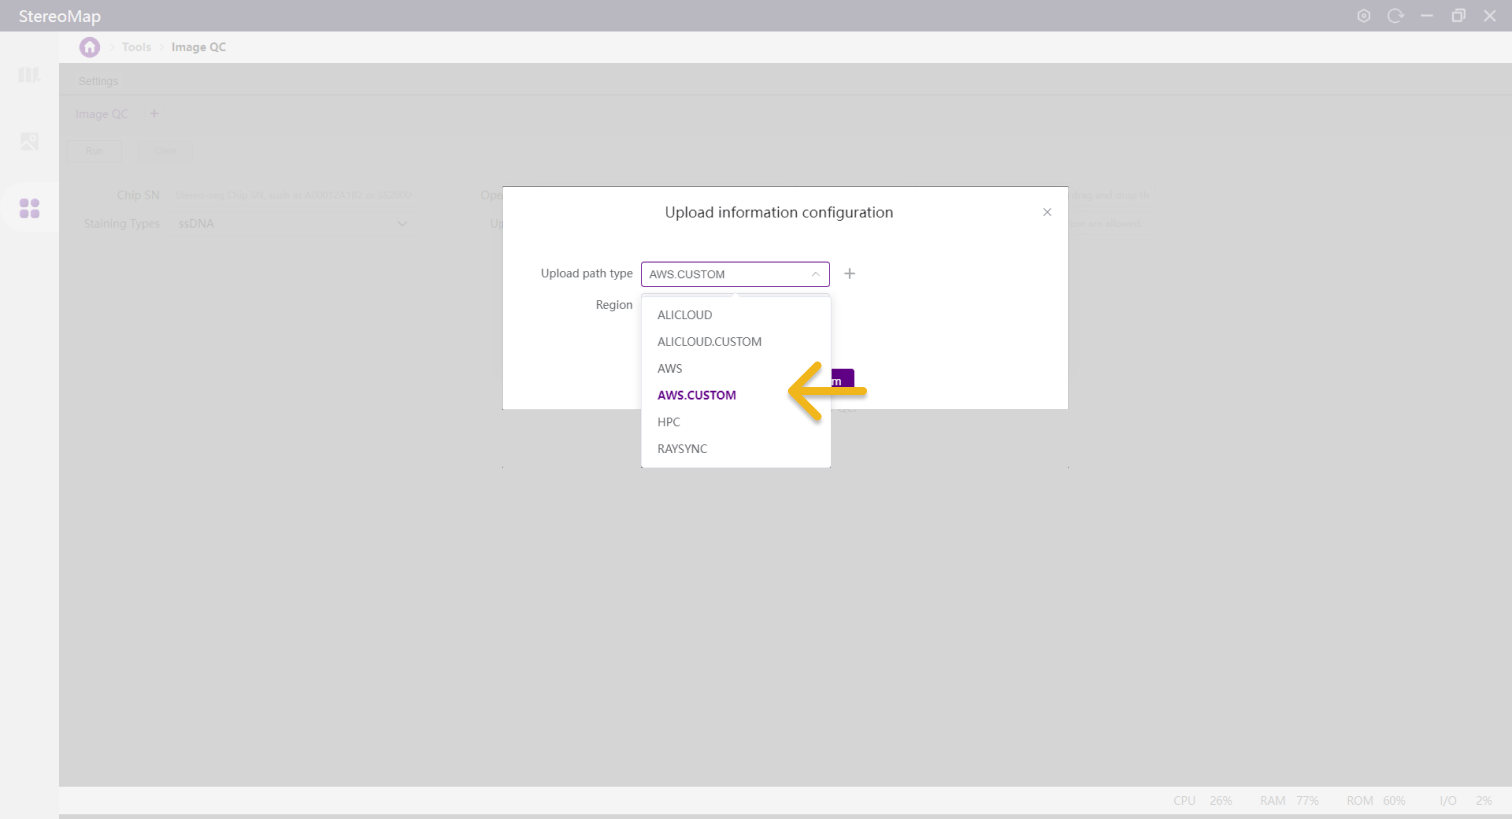
Built-in Upload Paths

ALICLOUD
Transfers images via Alibaba Cloud. Recommended for users in regions where STOmics Cloud is hosted on Alibaba Cloud. If new regions are available, contact FAS for setup.
SINGAPORE, AP
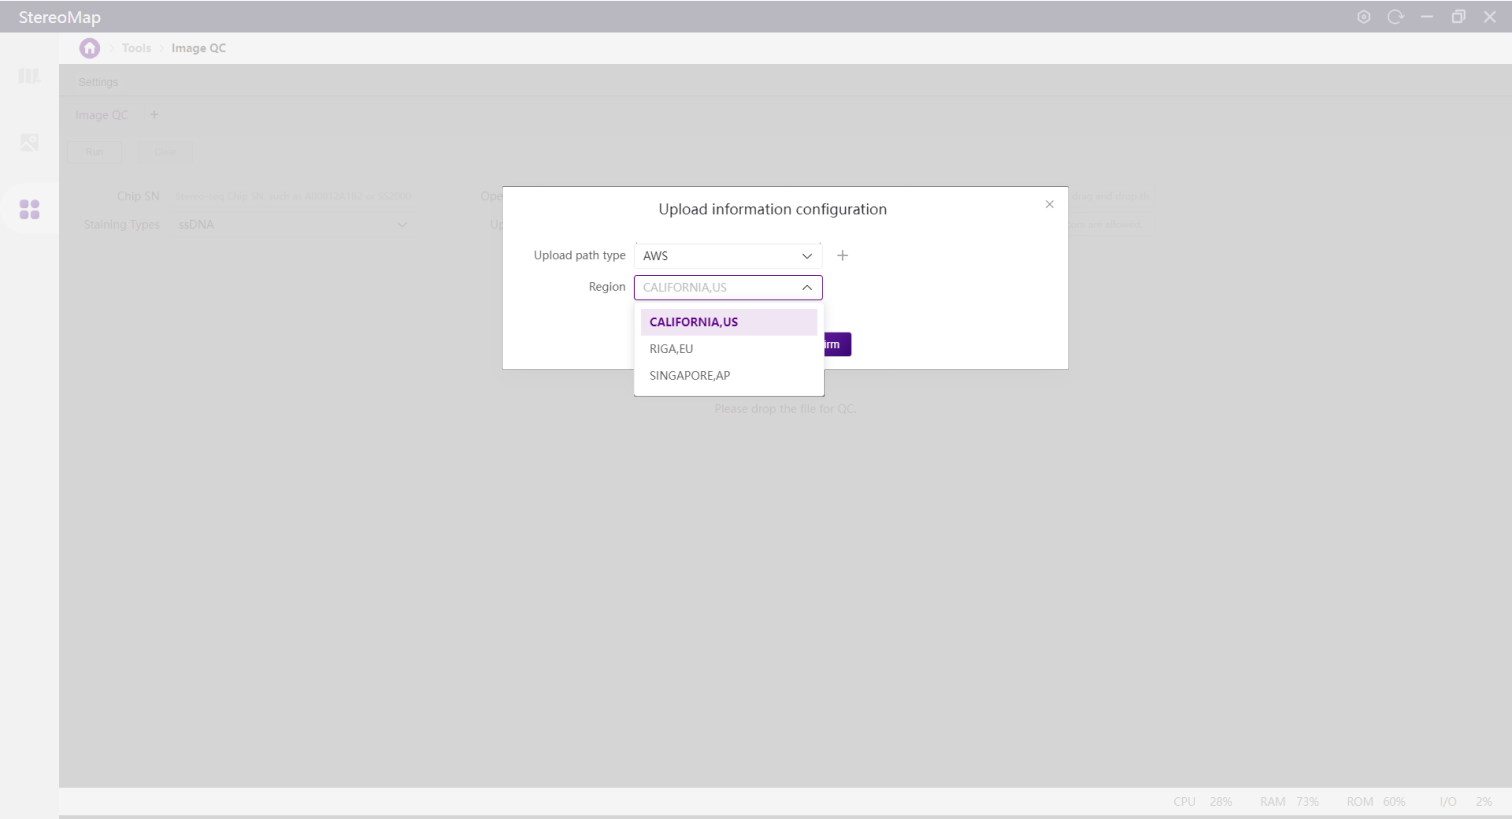
AWS
Transfers images using Amazon Web Service (AWS). Best for users where STOmics Cloud is deployed on AWS. Contact FAS for new region setup if needed.
CALIFORNIA, US
RIGA, EU
SINGAPORE, AP
HPC
Designed for laboratory internal networks, enabling direct uploads to local clusters. Contact FAS to configure in advance. Primarily used within STOmics Tech’s internal network.
CHONGQING, CN
SHENZHEN, CN
QINGDAO,CN
HAINAN,CN
RAYSYNC
Transfer images using Raysync over the internet, allowing seamless uploads to regional clusters without any additional setup.
CHONGQING, CN
QINGDAO, CN
SHENZHEN, CN
HAINAN,CN
Custom Upload Paths
If you have your own Alibaba Cloud or AWS cloud service, you can transfer images directly to your personal cloud storage bucket by setting a customized upload path.

Steps to Configure Custom Upload Paths
Select cloud service type
Choose between ALICLOUD.CUSTOM or AWS.CUSTOM.

Set the region to OWNER.

Enter required details
Remote path
KeyID & password
S3 bucket name
If using Alibaba Cloud, also provide domain information.
Confirm & save
Click Confirm to finalize the settings. Your customized configuration will appear in the Upload Information Configuration window.

Last updated